The git revert command undoes a committed snapshot. But, instead of removing the commit from the project history, it figures out how to undo the changes introduced by the commit and appends a new commit with the resulting content.
Reverting has two important advantages over resetting. First, it doesn’t change the project history, which makes it a “safe” operation for commits that have already been published to a shared repository. For details about why altering shared history is dangerous, please see the git reset page.
Second, git revert is able to target an individual commit at an arbitrary point in the history, whereas git reset can only work backwards from the current commit. For example, if you wanted to undo an old commit with git reset, you would have to remove all of the commits that occurred after the target commit, remove it, then re-commit all of the subsequent commits. Needless to say, this is not an elegant undo solution.
Don’t Reset Public History
You should never use git reset <commit> when any snapshots after <commit> have been pushed to a public repository. After publishing a commit, you have to assume that other developers are reliant upon it.
The point is, make sure that you’re using git reset <commit> on a local experiment that went wrong—not on published changes. If you need to fix a public commit, the git revert command was designed specifically for this purpose.
The git clean command is often executed in conjunction with git reset --hard. Remember that resetting only affects tracked files, so a separate command is required for cleaning up untracked ones. Combined, these two commands let you return the working directory to the exact state of a particular commit.
git clean -n
Perform a “dry run” of git clean. This will show you which files are going to be removed without actually doing it
Don’t amend public commits
Amended commits are actually entirely new commits and the previous commit will no longer be on your current branch. This has the same consequences as resetting a public snapshot. Avoid amending a commit that other developers have based their work on.
The last three commits (HEAD, HEAD^, and HEAD~2) were bad and you do not want to ever see them again. Do not do this if you have already given these commits to somebody else
HEAD is the pointer to the current branch reference, which is in turn a pointer to the last commit made on that branch. That means HEAD will be the parent of the next commit that is created. It’s generally simplest to think of HEAD as the snapshot of your last commit on that branch.
Then we run git commit, which takes the contents of the Index and saves it as a permanent snapshot, creates a commit object which points to that snapshot, and updates master to point to that commit.
Switching branches or cloning goes through a similar process. When you checkout a branch, it changes HEAD to point to the new branch ref, populates your Index with the snapshot of that commit, then copies the contents of the Index into your Working Directory.
Step 1: Move HEAD
The first thing reset will do is move what HEAD points to. This isn’t the same as changing HEAD itself (which is what checkout does); reset moves the branch that HEAD is pointing to. This means if HEAD is set to the master branch (i.e. you’re currently on the master branch), running git reset 9e5e6a4will start by making master point to 9e5e6a4.
No matter what form of reset with a commit you invoke, this is the first thing it will always try to do. With reset --soft, it will simply stop there.
When you run git commit, Git creates a new commit and moves the branch that HEAD points to up to it. When you reset back to HEAD~ (the parent of HEAD), you are moving the branch back to where it was, without changing the Index or Working Directory. You could now update the Index and run git commit again to accomplish what git commit --amend would have done
Step 2: Updating the Index (--mixed)
The next thing reset will do is to update the Index with the contents of whatever snapshot HEAD now points to.
If you specify the --mixed option, reset will stop at this point. This is also the default, so if you specify no option at all (just git reset HEAD~ in this case), this is where the command will stop.
Now take another second to look at that diagram and realize what happened: it still undid your last commit, but also unstaged everything. You rolled back to before you ran all your git add and git commit commands.
Step 3: Updating the Working Directory (--hard)
The third thing that reset will do is to make the Working Directory look like the Index.
The reset command overwrites these three trees in a specific order, stopping when you tell it to:
Move the branch HEAD points to (stop here if --soft)
Make the Index look like HEAD (stop here unless --hard)
Make the Working Directory look like the Index
Squashing
You can run git reset --soft HEAD~2 to move the HEAD branch back to an older commit (the most recent commit you want to keep):
And then simply run git commit again:
Running git checkout [branch] is pretty similar to running git reset --hard [branch] in that it updates all three trees for you to look like [branch], but there are two important differences.
First, unlike reset --hard, checkout is working-directory safe; it will check to make sure it’s not blowing away files that have changes to them. Actually, it’s a bit smarter than that — it tries to do a trivial merge in the Working Directory, so all of the files you haven’t changed in will be updated. reset --hard, on the other hand, will simply replace everything across the board without checking.
The second important difference is how checkout updates HEAD. Whereas reset will move the branch that HEAD points to, checkout will move HEAD itself to point to another branch.
For instance, say we have master and develop branches which point at different commits, and we’re currently on develop (so HEAD points to it). If we run git reset master, develop itself will now point to the same commit that master does. If we instead run git checkout master, develop does not move, HEAD itself does. HEAD will now point to master.
The other way to run checkout is with a file path, which, like reset, does not move HEAD. It is just like git reset [branch] file in that it updates the index with that file at that commit, but it also overwrites the file in the working directory. It would be exactly like git reset --hard [branch] file (if reset would let you run that) — it’s not working-directory safe, and it does not move HEAD.
To remove a remote branch (if you know what you are doing!)
COPY
gitpushorigin:the_remote_branch
or simply use the new syntax (v1.7.0)
COPY
git push origin --delete the_remote_branch
Note
If you get the error error: unable to push to unqualified destination: the_remote_branch The destination refspec neither matches an existing ref on the remote nor begins with refs/, and we are unable to guess a prefix based on the source ref. error: failed to push some refs to 'git@repository_name'
perhaps someone else has already deleted the branch. Try to synchronize your branch list with
COPY
git fetch -p
The git manual says -p, --prune After fetching, remove any remote-tracking branches which no longer exist on the remote.
The easiest way to integrate the branches, as we’ve already covered, is the merge command. It performs a three-way merge between the two latest branch snapshots (C3 and C4) and the most recent common ancestor of the two (C2), creating a new snapshot (and commit).
If you examine the log of a rebased branch, it looks like a linear history: it appears that all the work happened in series, even when it originally happened in parallel.
If you examine the log of a rebased branch, it looks like a linear history: it appears that all the work happened in series, even when it originally happened in parallel.
Often, you’ll do this to make sure your commits apply cleanly on a remote branch — perhaps in a project to which you’re trying to contribute but that you don’t maintain. In this case, you’d do your work in a branch and then rebase your work onto origin/master when you were ready to submit your patches to the main project. That way, the maintainer doesn’t have to do any integration work — just a fast-forward or a clean apply.
Git supports two types of tags: lightweight and annotated.
A lightweight tag is very much like a branch that doesn’t change — it’s just a pointer to a specific commit.
Annotated tags, however, are stored as full objects in the Git database. They’re checksummed; contain the tagger name, email, and date; have a tagging message; and can be signed and verified with GNU Privacy Guard (GPG). It’s generally recommended that you create annotated tags so you can have all this information; but if you want a temporary tag or for some reason don’t want to keep the other information, lightweight tags are available too.
Once the tag is created, you need to push the tag up to the master repository. By itself, push doesn't send the tags up, you also need to tell it to include the tags in the push by appending the --tags flag:
git push --tags
If you don't want to push all your tags, you can also be specific:
Example:
git push origin tag 7.x-1.0
To check and confirm remote tags, the command is git tag -l
Let’s tag the version prior to the current version with the name v1-beta. First of all we will checkout the previous version. Instead of looking up the hash, we are going to use the ^ notation indicating “the parent of v1”.
If the v1^ notation causes troubles, try using v1~1, referencing the same version. This notation means “the first version prior to v1”.
You can fetch one branch from all remotes like this:
git fetch --all
fetch updates local copies of remote branches so this is always safe for your local branches BUT:
fetch will not update local branches (which track remote branches); If you want to update your local branches you still need to pull every branch.
fetch will not create local branches (which track remote branches), you have to do this manually. If you want to list all remote branches: git branch -a
To update local branches which track remote branches:
git pull --all
However, this can be still insufficient. It will work only for your local branches which track remote branches. To track all remote branches execute this oneliner BEFOREgit pull --all:
git branch -r | grep -v '\->' | while read remote; do git branch --track "${remote#origin/}" "$remote"; done
Dealing with "deleted by us" and "deleted by them" conflicts
For some conflict notifications, Git will include a "Deleted by us" or "Deleted by them" message next to a file. That means that you modified a file in one branch and deleted it in another. Git has no way of knowing if you want to delete the file or modify it, so you need to make the choice yourself.
Dealing with this type of conflict is straightforward: you have to decide if the deleted file is still required. You can do that by opening the file and looking at its contents. If you want to keep the file deleted, use the "rm” command (for the command line). Otherwise, use the "add” command to restore the file. This will resolve the conflict for that file.
Keep your local repository up to date. Make regular pulls from the remote to ensure that your local repository has all the recent commits from your team.
If you’re working in a branch, merge stable into it at least once a day.
Instead of infrequent commits with a large number of changes, do regular small commits often.
Each commit should address a single particular part of the bigger project you’re working on.
Push commits to the remote right after you made them. In other words, don’t hoard commits in your local repo.
A word of caution: Only do this on commits that haven’t been pushed an external repository. If others have based work off of the commits that you’re going to delete, plenty of conflicts can occur. Just don’t rewrite your history if it’s been shared with others.
$ git rebase -i HEAD~4
So, a few things have happened here. First of all, I told Git that I wanted to rebase using the last four commits from where the HEAD is with HEAD~4. Git has now put me into an editor with the above text in it, and a little explanation of what can be done. You have plenty of options available to you from this screen, but right now we’re just going to squash everything into one commit. So, changing the first four lines of the file to this will do the trick:
pick 01d1124 Adding license
squash 6340aaa Moving license into its own file
squash ebfd367 Jekyll has become self-aware.
squash 30e0ccb Changed the tagline in the binary, too.
When I use git commit --amend or git rebase -i, vim opens up for me to make changes. If I then change my mind and exit vim without making any changes, a commit is still made which shows up in git reflog.
To get git to not make a change when you are executing git commit --amend or git rebase -i.
Just delete the message (and save). All git does is look for a non empty message to see if a valid commit happened. Since there is a commit message (because you commited something before) git thinks that its a valid commit or rebase.
:cq!
This will force an error to VIM and it will not save any changes.
This is most often done when you remembered what you just committed is incomplete, or you misspelled your commit message1, or both. Leaves working tree as it was before git commit.
Make corrections to working tree files.
git add whatever changes you want to include in your new commit.
Commit the changes, reusing the old commit message. reset copied the old head to .git/ORIG_HEAD; commit with -c ORIG_HEAD will open an editor, which initially contains the log message from the old commit and allows you to edit it. If you do not need to edit the message, you could use the -C option instead.
If you don’t want to type it every single time you push, you can set up a “credential cache”. The simplest is just to keep it in memory for a few minutes, which you can easily set up by running git config --global credential.helper cache.
4. Revert your git repo to a previous commit
‘Reverting’ can make a lot of senses in a many cases — especially if you’ve completely messed up a piece of code. The most common case is when you want a go back in time and explore a previous state of your codebase, then return back to your present state.
git checkout <SHA>
It will detach the HEAD, and let you fool around with no branch checked out. Don’t worry — detaching your head is not as scary as it sounds. If you want to make commits while you’re here, you can do so by creating a new branch here:
$ git checkout -b <SHA>
To go back to the present state, just checkout to the branch you were on previously. Stack Overflow answer
Every-time you create a file, and track it, git compresses it and stores it into its own data structure. The compressed object will have a unique name, a hash, and will be stored under the object directory.
What’s inside a commit ?
Every-time you create a file, and track it, git compresses it and stores it into its own data structure. The compressed object will have a unique name, a hash, and will be stored under the object directory.
Before exploring the object directory we’ll have to ask ourselves what is a commit. So a commit is kind of a snapshot of your working directory, but it is a little bit more than that.
In fact when you commit git does only two things in order to create the snapshot of your working directory:
1. If the file didn’t change, git just adds the name of the compressed file (the hash) into the snapshot.
2. If the file has changed, git compresses it, stores the compressed file in the object folder. Finally it adds the name (the hash) of this compressed file into the snapshot.
This is a simplification, this whole process is a little bit complicated and will be part of a future post.
And once that snapshot is created, it will also be compressed and be name with an hash, and where all those compressed objects end up ? In the object folder.
├── 4c
│ └── f44f1e3fe4fb7f8aa42138c324f63f5ac85828 // hash
├── 86
│ └── 550c31847e518e1927f95991c949fc14efc711 // hash
├── e6
│ └── 9de29bb2d1d6434b8b29ae775ad8c2e48c5391 // hash
├── info // let's ignore that
└── pack // let's ignore that too
This is what the object directory looked like after I created one empty file file_1.txt and commited it. Please note that if the hash of your file is “4cf44f1e…”, git will store this file under a “4c” subdirectory and then name the file “f44f1…”. This little trick reduces by 255 the size of the /objects directory.
You see 3 hash right. So one would be for my file_1.txt, the other would be for the snapshot created when I commited. What is the third one ? Well because a commit is an object in itself, it is also compressed and stored in the object folder.
What you need to remember is that a commit is made of 4 things :
The name (a hash) of the working directory’s snapshot
A comment
Commiter information
Hash of the parent commit
And that’s it, look by yourself what happen if we uncompressed the commit file :
// by looking at the history you can easily find your commit hash
// you also don't have to paste the whole hash, only enough
// characters to make the hash unique
tree 86550c31847e518e1927f95991c949fc14efc711
author Pierre De Wulf <test@gmail.com> 1455775173 -0500
committer Pierre De Wulf <test@gmail.com> 1455775173 -0500
commit A
You see, we got as expected, the snapshot hash, the author, and my commit message. Two things are important here :
As expected, the snapshot hash “86550…” is also an object and can be found in the object folder.
Because it was my first commit, there is no parent.
And here we find the last object that was previously in our object store, the only object that was in our snapshot. It’s a blob, but that’s another story.
branch, tags, HEAD all the same
So now you understand that everything in git can be reached with the correct hash. Let’s take a look at the HEAD now. So what’s in that HEAD?
cat HEAD
ref: refs/heads/master
Okay, this is not an hash, and it makes sense, because the HEAD can be considered as a pointer to the tip of the branch you’re working on. And now if we look at what is in refs/heads/master here what we’ll see :
Does that look familiar? Yes this is the exact same hash of our first commit. This shows you that branches and tags are nothing more than a pointer to a commit. Meaning that you can delete all the branches you want, all the tags you want, the commit they were pointing to are still going to be here. There are only be much more difficult to access.
git-rebase: Reapply all the commit from your branch to the tip of another branch.
A rebase will sequentially take all the commit from the branch you’re in, and reapply them to the destination. This behavior has 2 main implications:
By reapplying commits git creates new ones. Those new commits, even if they bring the same set of change will be treated as completely different and independent by git.
Git rebase reapplies commits, and does not destroy the old ones. It means that even after a rebase, your old commits will still be in the /objects folder in your .git directory. If you are not really familiar with how git consider and stores commit you could learn some interesting things here.
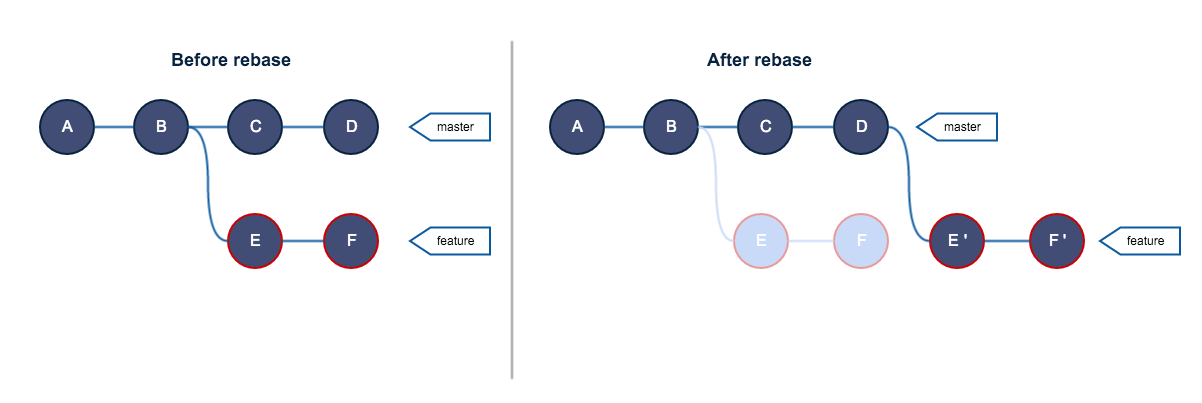
So this could be a more accurate representation of what actually happens during a rebase:
As you can see, the feature branch has completely new commits. As said before, same set of changes, but completely different objects from the git point of view. And you can also see that previous commits are not destroyed. They are simply not directly accessible. If you remember, a branch is only a pointer to a commit. Therefore if neither branches nor tags are pointing to a commit it becomes almost impossible to reach, but the commit still exists.
The golden rule of rebase
“No one shall rebase a shared branch” — Everyone about rebase
You have probably came across that rule, maybe phrased differently. For those who haven’t, this rule is quite simple. Never, NEVER, NEVER, rebase a shared branch. By shared branch I mean a branch that exists on the distant repository and that other people on your team could pull.
Too often this rule is thrown as a divine truth and I think understanding it could be a good thing if you want to improve your understanding of git.
To do that, let’s imagine a situation where a dev breaks the rule and see what happens.
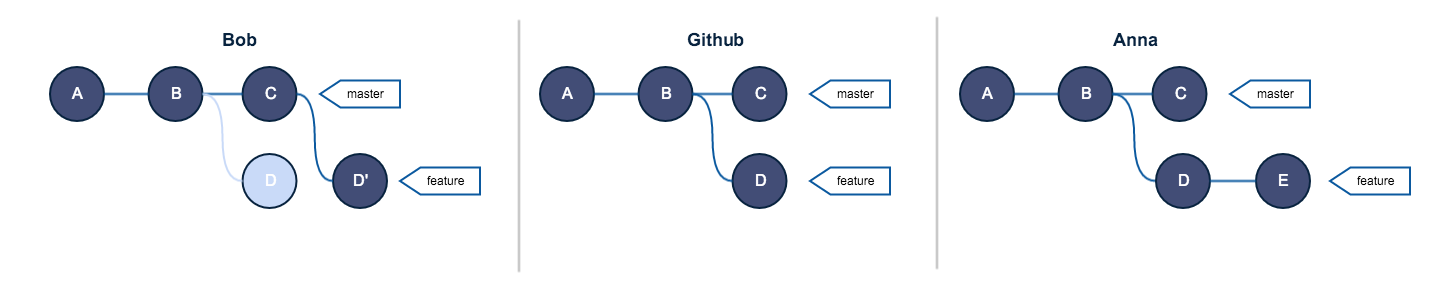
Let’s say Bob and Anna are both working on the same project. Here is an overview of both Bob’s, Anna’s repos and the remote on GitHub:
Everybody is sync with the remote (GitHub)
Now Bob, innocently breaks the golden rule of rebase, in the mean time Anna decides to work on the feature and creates a new commit:
Do you see what’s coming ?
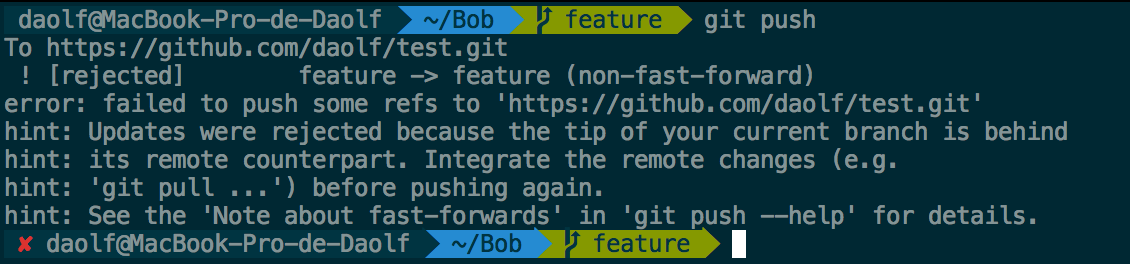
Bob tries to push now, he got rejected and receives that kind of message:
Here git is not happy because it doesn’t know how to merge the Bob feature branch with the GitHub feature branch. Usually when you push your branch on the remote, git merges the branch you’re trying to push with the branch currently on the remote.
Before the pull those are the commits in the distant and local feature branch:
A--B--C--D'   origin/feature // GitHub
A--B--D--E    feature        // Anna
When you pull, git has to do a merge to resolve this issue. And this is what happens:
The commit M represent the merge commit. The commit where Anna’s and GitHub’s feature branch were finally reunited. Anna is finally relieved, she managed to resolve all the merge conflicts and can now push her work. Bob decides to pull, and everyone is now synced.
https://github.com/tiimgreen/github-cheat-sheet
Git Grep will return a list of lines matching a pattern.
$ git grep aliases
-e The next parameter is the pattern (e.g. regex)
--and, --or and --not Combine multiple patterns.
$ git grep -e pattern --and -e anotherpattern
Git Stripspace:
Strips trailing whitespace
Collapses newlines
Adds newline to end of file
A file must be passed when calling the command, e.g.:
$ git stripspace < README.md
git status -sb
Auto-Correct
To call commit when comit is typed, just enable auto-correct:
$ git config --global help.autocorrect 1
To add more color to your Git output:
$ git config --global color.ui 1
Present-tense summary under 50 characters

* More information about commit (under 72 characters).
* More information about commit (under 72 characters).

http://project.management-system.com/ticket/123
If you've created more than one commit, use git rebase interactively to squash them into cohesive commits with good messages:
git rebase -i origin/master
Share your branch.git push origin <branch-name>
Rebase interactively. Squash commits like "Fix whitespace" into one or a small number of valuable commit(s). Edit commit messages to reveal intent. Run tests. git fetch origin git rebase -i origin/master
Force push your branch. This allows GitHub to automatically close your pull request and mark it as merged when your commit(s) are pushed to master. It also makes it possible to find the pull request that brought in your changes. git push --force-with-lease origin <branch-name>
View a list of new commits. View changed files. Merge branch into master. git log origin/master..<branch-name> git diff --stat origin/master git checkout master git merge <branch-name> --ff-only git push
Delete your remote feature branch. git push origin --delete <branch-name>
Delete your local feature branch. git branch --delete <branch-name https://help.github.com/articles/about-git-rebase/
The git rebase command allows you to easily change a series of commits, modifying the history of your repository. You can reorder, edit, or squash commits together.
Typically, you would use git rebase to:
Edit previous commit messages
Combine multiple commits into one
Delete or revert commits that are no longer necessary http://kentnguyen.com/development/visualized-git-practices-for-team/Branch out, merge often, keep in sync
You are about to make a major or disruptive change
You are about to make some changes that might not be used
You want to experiment on something that you are not sure it will work
When you are told to branch out, others might have something they need to do in master
After branching out, you should keep in-sync with the master branch, because eventually you need to merge it back to master. In order to avoid a huge complicated mess of conflicts when merging back, you should commit often, merge often.
(on current branch) git rebasing is taking all your local changes since the last push and put them ahead of other people’s changes regardless of the date you made the commit.
Base on that, git pull --rebase means pulling all the new changes made by others, then taking all my changes that are not yet pushed, and put them ahead of other people’s changes on the current branch.
the diff command is used to compare differences between two versions of a file. The resulting file is called a patch, and typically is given (by the user) a ".patch" or ".diff" suffix.
This patch file then can be used on other copies of the "old" file by using the patch command, thus updating their "old" file(s) to match the "new" file(s).
This will create a new file fix_empty_poster.patch with all changes from the current (fix_empty_poster) against master. Normally, git would create a separate patch file for each commit, but that’s not what we want. All we need is a single patch file.
gitapply--statfix_empty_poster.patch
Note that this command does not apply the patch, but only shows you the stats about what it’ll do. After peeking into the patch file with your favorite editor, you can see what the actual changes are.
To apply the patch, I’ll use git am instead of git apply. The reason for this is that git am allows you to sign off an applied patch. This may be useful for later reference.
git am --signoff < fix_empty_poster.patch
Applying: Added specs to test empty poster URL behaviour
Applying: Added poster URL as part of cli output
git apply [patch-name].patch
You can reverse a patch if you have finished testing. To reverse the patch, use the patch command with the -R option:
git apply -R path/file.patch